Starting Seeds Indoors
By starting seeds indoors you can grow healthy vegetables that you would never find at your local grocery store, and you can grow them for a fraction of the price. Likewise, when it comes to flowers in your garden. By growing them from seed you can choose from a dazzling array, many of which are only available in seed form. Look for your favourites or perhaps try out some heirloom varieties. Just don’t be afraid to experiment with something new.
Getting children involved in the process can also be a lot of fun. Whether it's flowers or food, there is something timeless and magical about kids watching their seeds sprout and grow. It’s a great way to educate little gardeners.
Even when space is limited, it's surprising how much you can grow. You can easily raise vegetables in containers on a balcony or in a small garden. All that you really need is a sunny location. Keep in mind that most vegetables require around six hours of sunlight a day, leafy vegetables can tolerate some shade.
Before You Start
- Do a bit of research. Seed catalogues are full of helpful information, and there are lots of online resources, but the best is to come down to your local GARDENWORKS and talk to our knowledgeable staff.
- Find a planting chart. These are usually found in seed catalogues, in store, or even online and are very helpful to know when to sow, transplant and harvest.
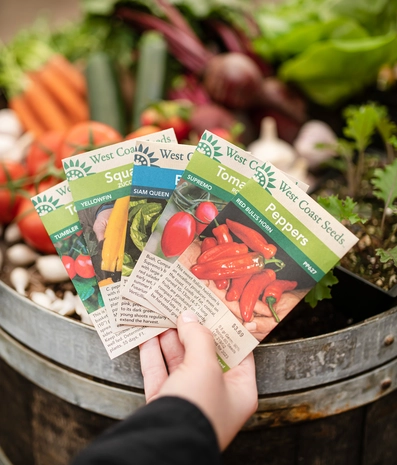
- Visit the in-store seed racks decide what you are going to grow and then check when they need to be sown, and the spacing they require (you need to know if you have room to grow them). There is a lot of information found on both the back of the seed packets or seed catalogues.
- Find a spot in your home that is suitable to seed starting. If it's near a window, make sure that the temperature does not fluctuate drastically. The best spot is an area out of direct light with stable room temperature in the range of 16°C to 21°C during the day.
- Gather your materials, and for that you should check the list below. Also make sure to find and choose some good planting containers.
But before you run out to buy your seeds an important note of caution. Some seeds should not be started inside and instead be sown directly in the garden (this is called direct sowing). Examples of this are root crops like carrots and beets, they do not transplant well so moving them can result in malformed roots. Cool weather crops, like lettuce, radish and spinach, should be directly sown. Also it’s not advisable waste time and effort starting easy flowers like asters, clarkia, alyssum, California poppies or wildflower mixtures inside. It’s much easier to scatter them directly into your garden.
Materials Checklist
- Your seeds, of course.
- A specially blended seed starting growing media mix, such as our GARDENWORKS Organic Seed Starting Mix. Don’t be tempted to use garden soil or regular planting mix, it is too heavy and is not always sterilized for indoor use.
- Your choice of container to grow your seeds in. This can be seed flats and inserts in either cells or rows, peat or coir pots in plastic seed flats, azalea pots (pots that are short and wide), or even peat/coir pellets.
- Mister bottle
- Water insoluble marker and plant labels
The above are the necessities for starting seeds indoor, but if you want to really set yourself up for success below are a couple of seed staring accessories that make a big difference.
- A heating mat for bottom heat. Your seeds need to believe that spring is coming and the soil is being gently warmed by the sun.
- A clear dome to create the high humidity seeds need to germinate.
- A grow light, because not all windowsills are created equal.
Choosing the Right Container
The type of inserts you choose should dependent on the type of seed and length of growing time before transplanting outside. If you are sowing very fine seeds such as begonias, use inserts that have rows of seeding areas. This makes it easier for you to transplant and also to sow a large number of seeds. If you wish to have a large sized plant at transplant time, choose the large celled packs to encourage unhindered root growth.
Choosing and Preparing Your Growing Medium
Clear off an area (preferably on a counter) where you can make a mess, or easily clean up. Moisten your starter mix with warm water and work through the mix with your fingers, trying your best to eliminate any dry clods. Add the moistened starter mix to flats, flat inserts or peat containers up to approximately 1cm from the top rim. Tap the container down to rid the soil of air bubbles. In the case of jiffy pots, place them in a tray with about 1cm of warm water and let them absorb the water.
Planting the Seeds
The method of sowing a seed depends on the type and size of seed.
- Large seeds such as sunflowers, cosmos, calendulas and beans, sow each seed in individual peat pots, individual cell inserts or in pre-soaked jiffy pots. Check you seed package for planting depths but a general rule is to plant the seed down approximately 2.5 times the width of the seed. For example, a sunflower seed is about 1cm wide so plant it 2.5cm deep. Large seeds tend to germinate and develop very quickly. Some seeds such as peas can be soaked overnight to help soften the seed coat before planting.
- Very fine seeds can be mixed with sand in a cup and sprinkled or “broadcast”onto either prepared flats or wide, shallow pots like azalea pots. This helps to evenly distribute them.
- All other seeds can be planting in row inserts or flats according to the package directions.
- For row inserts, tap seeds from the packet into the rows and cover gently with seeding media, washed horticultural sand or moistened vermiculite.
- For flats, make ridges with a pencil or chopstick and cover gently with seeding media, washed horticultural sand or moistened vermiculite.
Taking Care of the Seeds During Germination
Once the seeds are sown and labelled, mist the surface of the flats, container or peat pots. Do not soak. Place these newly seeded containers in your designated seedling area. In a few days (sometimes weeks), the seeds will germinate.
It is important that the seeds are neither over-watered nor left to dry out. If seedlings are over-watered they may suddenly loose vigour and fall over or "damp off." Check on your seedling regularly and adjust watering and ventilation as needed.
At this stage the seedlings do not need any fertilization, they have enough stored food to take them to the first leaf stage.
Spacing the Seedlings
When the seedlings grow their first set of true leaves (please see the illustration below), it is time to space them out. Use a dibbler (a pointed object for transplanting seedlings), or pencil, or chopstick, to gently lift the seedling out. Then with your other hand, guide the plant by its true leaves (not the stem or seed leaves) into a pre-made hole. Lower the roots in to the hole gently and make sure that the plant is at the same level in the soil as it was in the seed tray. Gently firm the soil around the base of the plant. Seedlings may be transplanted into cell packs in groups of 4, or in to smaller cell packs individually.
Fertilizing Your Transplanted Seedlings
The seedlings can be fertilized after transplanting. Use either a well balanced water soluble fertilizer such as GARDENWORKS 20-20-20, or a slow releasing fertilizer such as GARDENWORKS 14-14-14. Make sure you read the rates prior to mixing the solutions as strong mixtures of fertilizers can easily hurt your young seedlings.
Hardening Off
The next step is "hardening off" the plants prior to planting them in the garden. Hardening off is a process of preparing the plants for outdoor conditions. You may begin this process two weeks before planting them in the garden by placing the plants outdoors (out of direct sun) everyday and taking them in during the night, when cooler temperatures may put your seedlings at risk. Dates for planting out are also mentioned on the back of seed packets and in seed catalogues.
Transplanting
Don’t be in a rush to plant your seedlings in the garden. You need to be sure all danger of frost has passed before setting them out. Also take some time to plan the garden in advance, making sure your tall plants won’t shade your low growing plants. It’s hard to move them after the fact.
Water the seedlings thoroughly before transplanting. This helps prevent transplant shock. It’s preferable to transplant on a cloudy day so strong sun won’t wilt your seedlings. Press the soil firmly around the roots. Water immediately after transplanting and then every day for the first week. Using GARDENWORKS Transplant Fertilizer greatly reduces transplant shock and encourages strong and healthy root formation. Be sure to water deeply so your plants won’t develop shallow roots.